Table of Contents
How to make ombre nail art?
Ombre nail art is one of the biggest nail polish trends 2022. I like to show you how to make ombre nail art. What do you need and how to make sure your ombre nail polish looks great?
Do you know ombre mainly from the ombre hair colors? That’s also a gradient color, so you’re going to create the same effect on your nails.

What do you need to make ombre nail art?
I personally prefer to make ombre nail art with regular nail polish. What do you need?

- a basecoat
- different colors of nail polish
- a sponge
- liquid latex to protect your finger from nail polish spills
- a quick-drying topcoat
- acetone and a brush to clean up your nail art

How to make ombre nails: step-by-step
-
Basecoat
Start by first applying a basecoat. Let this dry thoroughly.

-
Apply liquid latex
Then apply the fluid latex, I usually use 2 coats.
-
First coat of nail polish
.
I paintlike to apply my nails in the lightest color of the ombré, depending on the color apply 1 to 2 coats. Let this dry thoroughly. -
Ombre effect making
Alright, now it’s time to get down to the ombre itself! Take a sponge and make the sponge about the same width as your nails, slightly wider. I have noticed that if the sponge is not too wide, I also spill a lot less on my fingers themselves. So that’s a lot less clean-up work!
Do this in a few layers, to build up the ombre effect.
-
Liquid latex removal & clean-up
Let the nail polish dry and start by removing the fluid latex from your fingers. Did you still spill some on your fingers? Finish your nail art by doing a neat clean-up with a brush and acetone.
-
Topcoat
Let dry again for a while, then finish with a quick drying topcoat.
-
Nail oil and hand cream
.
Once your nails are dry, pamper your cuticles with a nice nail oil, also apply a little hydrating hand cream to your hands and fingers.


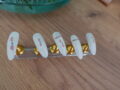
The end result:
Ta-daaaa… This is my own ombre nail look I made in the video. Didn’t actually take that long at all!
Tips for ombre nails
- Don’t worry about the texture of the nail polish when you are stamping. Once you apply a topcoat, you won’t see any of it.
- Apply the liquid latex super carefully: nothing should get on your nail, otherwise you will pull your nail art with it.
- If you find it difficult to create an ombre effect with 2 colors, you can try with 3 colors.
Ombré nail art designs and examples
White-pink ombre nails

Pink ombre nails with clouds

Black gold ombre nails

French Ombre nails

These french ombre nails are a big hit on Tiktok right now, perhaps it is the nail trend you are seeing there right now.
Baby boomer ombre nails

Baby boomer ombre nail art, a super-popular nail art on Tiktok and Instagram.
Lilac and pink ombre nails

Beautiful lilac ombre nail art decorated with rhinestones and cute butterflies.
Lilac ombre nails with glitter and blue

Holographic ombre nails

Holographic ombre nail art: you create these with a holographic powder that you dab onto your nail.